Creating An Activity
At the Opportunity Level, Pursuit Flow’s Activity Tab allows authorized users the ability to create an activity. To create a new Activity, perform the following step(s):

Steps:
- On the Opportunity, click “Activity Tab” within Pursuit Flow
- Click “Add Activity”
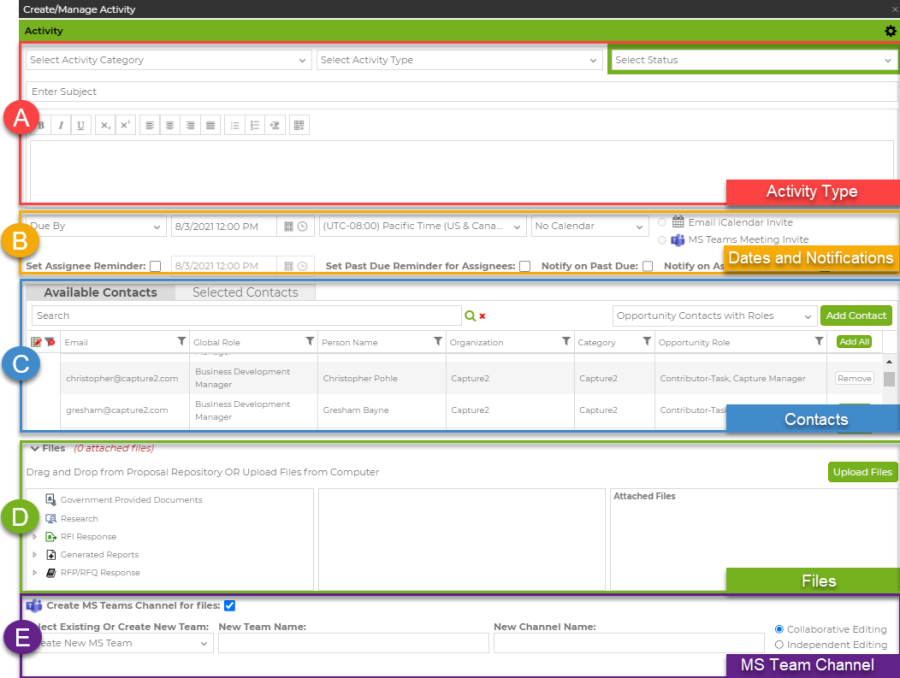
- Once clicked the Create/Manage Activity screen will open. An Activity consists of five sections, which are addressed in detail below. Expand and collapse each lettered section to make it easier to refer to the diagram while working.
Selecting the Activity Type and Description
The following are step-by-step instructions for this section:
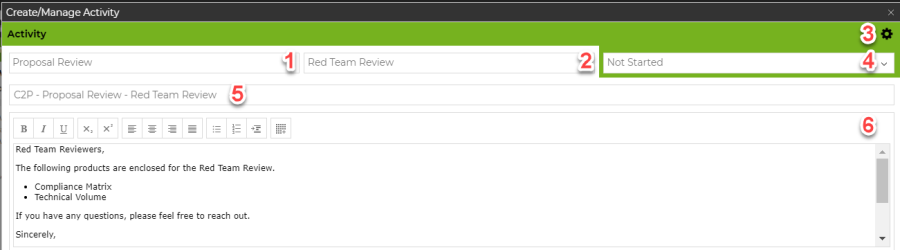
- Select an “Activity Category”. Select this option to display the Activity categories that have been created to organize and group Activity Types. Each predefined Activity Type will be grouped by the corresponding Category. If no predefined Activities have been created, the user can type a fee form Activity Type in the Activity type input area. Note *Activity Categories can be created/edited in the Admin Console’s Activity Category & Type Configuration Panel.
- Select an “Activity Type”. The Activity Type input area functions as a pull-down options selector or a text input if no predefined Activity types have been defined. An Activity Type must be selected before an activity can be created. Note * Activity Categories can be created/edited in the Admin Console’s Activity Category & Type Configuration Panel.
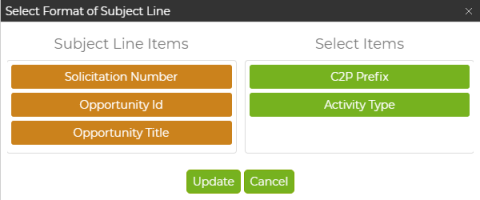
- : (Optional) Click Gear Icon (Subject Line Format Widget) to change how the format of the subject line is generated. The configuration selected will be saved to your preferences.
- (Optional) Select “Status”. The Status represents the initial status that will be set for the new Activity. Note* Each Activity Type has a predefined set of status types that automatically update based on activity status configuration. (Link to Admin Section)
- : (Optional) Enter “Activity Subject”. The Activity Subject line is automatically populated when you select the “Activity Category” and “Activity type” based on “Subject Line Format Widget”. Additional text may be added or removed from the input area. This information will appear in the subject line of all Emails, Calendar Invites, MS Teams Channel (as default) and in the Activity Grid.
- Enter “Activity Description”. The Activity Notes input area is a free form note that is viewable when reviewing the activity. This input is optional but may be helpful when reviewing the activity.
Activity Dates, Invites and Notifications
In this section, the user can set the activity due date or duration, include a calendar invite with/without MS Teams Meeting, and set up notifications and reminders for both the assignor (person creating the activity) and assignee (person(s) assigned to activity). The following are step-by-step instructions for this section:

B-1 : Activity Dates
- Select “Due By” or “Duration”
- Duration: Set Duration if the user desires to document the activity happening over a period.
*Note* The Activity Calendar will reflect either the Duration or the Due Date.

- Due By: Select Due By if the user wants to define when assignees are required to complete the task.
- Duration: Set Duration if the user desires to document the activity happening over a period.
- Depending on whether Due By or Duration was selected, the Select Date window will display the current date and time. Click on the small calendar icon. Select a start date. Select the small clock icon to select the start time. Repeat the same process for selecting the End date and time for the Activity. If the Activity ends on the same day as it starts, simply select an end time using the “To” clock icon. If an activity ends on a latter day, select the calendar icon on the “To” input.
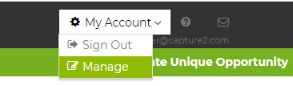
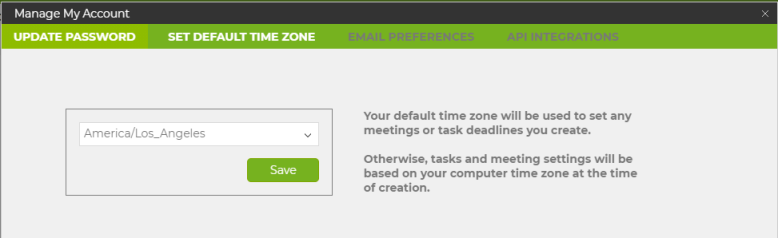
- Set Time Zone: By default, the time zone will be populated with your default time zone, which can be configured in the Manage Account. If an alternative time zone is required, simply select the appropriate time zone from the pull-down list.
The Calendar selection pull-down enables email invites to “iCalendar” or “MS Teams Meeting”.
- Select “Duration Start to End” or “Due/End Date” to enable the invite option. The “Email iCalendar Invite” will include an iCalendar Invite (i.e., Outlook/Gmail) while an “MS Teams Meeting” will include an MS Teams Meeting in the activity invite.

B-3: Reminders and Notifications
Reminders provides the user, who is creating the activity, to configure notification reminders to the assigned parties. Based on the selected options emails will be sent to the assignees and/or assignor.

- (Optional) Check “Set Assignee Reminders” and enter Date and Time for the reminder.
- Select this option to Email a reminder to all the assigned contacts withing the activity. The reminder date can be set with the date selector.
- (Optional) Check “Set Past Due Reminder for Assignees”.
- Select this option to send Past due Emails to Assignees when their assignments are past due.
- (Optional) Check “Notify on Past Due”.
- Set this option to Email the activity manager when the activity passes it’s end date.
- (Optional) Check “Notify on Assignment Update”
- Set this option to Email the activity manager when assignees update their assignments.
Section C: Activity Contacts Grid
The activity contracts grid consists of two tabs; “Available Contacts” (Available Contacts tab displays the available contacts withing the selected contacts types). and “Selected Contacts” (The selected contracts tab displays all the contacts that have been added to the activity).
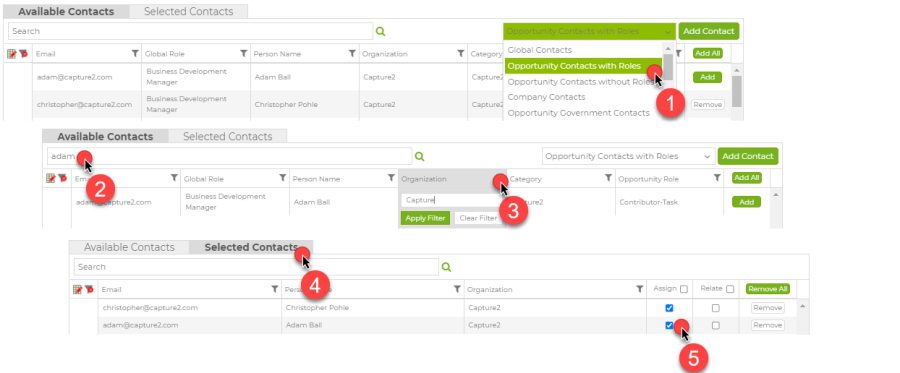
- Select a Contacts List from the Contact List Drop Down. The Contact List Drop Down contains two sets of lists; (1) Distribution Lists (e.g., Alliant Sub-Contractors), which can be created by the user on the Contacts Page (Click to Learn More), and (2) the following C2P out-of-the-box lists:
- Global Contacts - Contains all contacts related to your account.
- Company Contacts – Contains all contacts where Licensed Email or Organization Name equal to that of the Company Name
- Company Contacts – Contains all contacts where Licensed Email or Organization Name equal to that of the Company Name.
- Opportunity Contacts with Roles - Contains any contact that has a role with the opportunity.
- Opportunity Contacts without Roles - Contains all contacts that have not been assigned any role but are related to the opportunity.
- Opportunity Government Contacts - Contains all Government Contacts related to the opportunity.
- Enter Text in Contact Search:
- Click Search Icon
 . With text base search, you can search on any piece of information that is associated to a contact, such as Organization Name, Role, Title, Phone, Name, etc., To reset or search again, clear or type in new key words and select the Magnifier icon again.
- Click Search Icon
- Select Column to Filter
- Click Filter Icon
- Enter Text
- Click Apply Filter.
- The Available Contacts grid can be filtered by using one of the small funnel Icon
 next to each respective data element in the grid. By setting criteria in selected data elements, you can select only the sub-set of the data you would like to see. You may set multiple data elements filters in your grid.
- Click the “Selected Contacts Tab.”
- A flashing number in the Contacts Tab indicates the number on contacts that need to be assigned or related
- Check Assigned or Related. The user must Assign or relate the contact to the activity. A flashing number in the Contacts Tab indicates the number on contacts that need to be assigned or related. Select the appropriate check box based on the following criteria:
- Assigned - Assigning contacts will invite them to access this opportunity and upload files to the Activity.
- Related - Relating contacts will store their information on this Activity, but not invite them to participate in this Activity. A related contact will not have access to the files or activity information. An ideal example would be contact management POC outside your organization, such as a Government Contact. You might want that Government’s POC information available when the activity is due, but you don’t want to invite that Government POC to C2P.
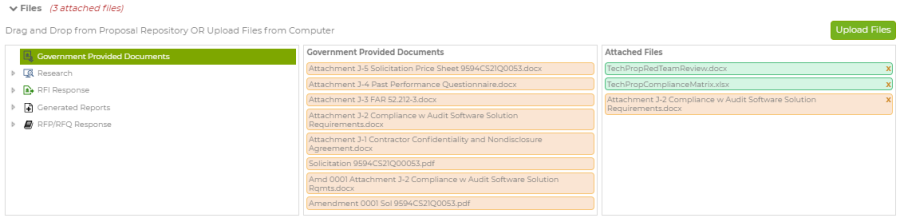
Section D: Attaching Files to an Activity
To include files with the activity, you may either upload them from your device or select from existing opportunity files.
To attach files currently stored in the opportunity, perform the following actions:
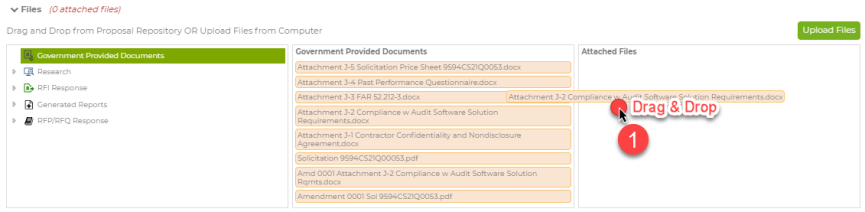
- In the selected folder, left click and hold to drag the file to attach files
To upload from your device, perform the following actions:
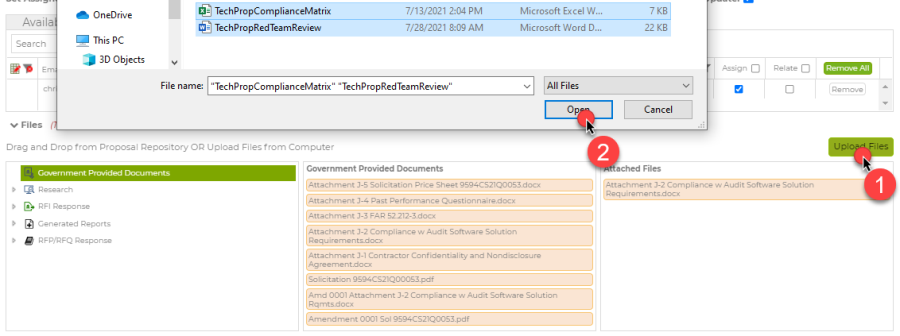
- Click “Upload Files” to access Device
- Select Files and Click Open
Both methods can be used to attach files to an activity. The result of uploading two files from your device and copying one file from your Opportunity documents, should look like the image below.
Section E: Create MS Team Channel
If MS Teams is configured for your account (reference MS Teams Configuration Section) you will have the ability to leverage MS Teams’ capabilities (e.g., file sharing, chat, live editing) for this activity.

To leverage MS Teams, perform the following actions:
- Check “Create MS Teams Channel for files” checkbox. Once checked, all MS Teams fields will become visible.
- Select “Existing” or “Create New Team”. Prior to creating a MS Team Channel, you must determine if you would like to place that channel under an existing MS Team or create a new MS Team.
- Select Team allows you to select or edit the MS Team for this Activity.
- If “Create New Team” was selected, the Select Team field will be populated with the name of the opportunity. You can edit the name of if you wish.
- If “Select Existing Team” was selected, the Select Team field will contain a drop down with two lists.
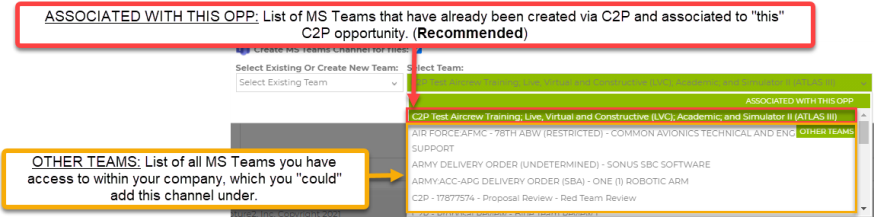
- Associated with This Opp contains a list of MS Teams, previously created by C2P for this opportunity. C2P maintains a relationship between these previously created MS Teams and the C2P opportunity. Note* Best practice is to use the MS Team that was previously created by C2P.
- Other Teams contains all MS Teams that you currently have access to within your organization.
- Enter “New Channel Name”: The channel name is populated with the subject line; however, it can be renamed to what every you want. The channel that is created is a private channel which can only be accessed by those assigned to the activity. This is ideal, ensuring that no person can be access the MS Team Channel, unless the activity creator provides them access.
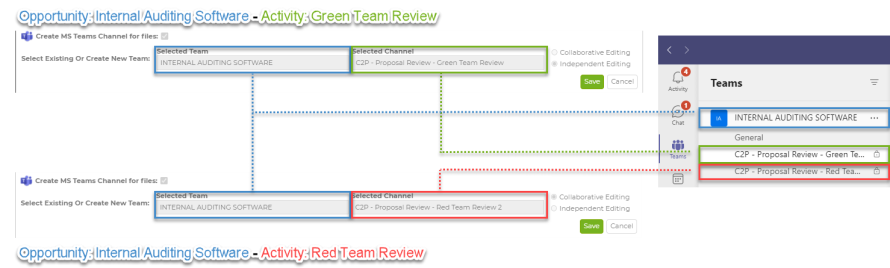
- The diagram below shows the relationship between the MS Team, created for the “Internal Auditing Software Opportunity, and the two MS Team Channels created for two separate activities (i.e., Green Team Review and Red Team Review). Notice both MS Team Channels fall under the MS Team that was created via C2P for the Internal Auditing Software opportunity.
- The diagram below shows the relationship between the MS Team, created for the “Internal Auditing Software Opportunity, and the two MS Team Channels created for two separate activities (i.e., Green Team Review and Red Team Review). Notice both MS Team Channels fall under the MS Team that was created via C2P for the Internal Auditing Software opportunity.
- Select “Collaborative Editing” or “Independent Editing”
- Collaborative Editing: All assignees can make, and view edits made by other assignees. Ideal for real time collaborative editing of document(s)
- Independent Editing: Each assignee can only view and edit their unique copy of a document. Ideal for independent assessments (e.g., Color Reviews) where feedback, not influenced by others, is desired. The assignor can create a merged document with all individual edits.
- Click Save. Once all the options have been selected and contacts assigned, select the “Save” button at the bottom of the screen. If a required option or date is missing the system will prompt you with the required update. Once the activity has been saved, the new activity will appear in the “Activities Grid” and the Email invites will be sent. If a MS Teams activity was created a spinning wheel will appear in the Activities grid until the Teams Meeting is finished being created.