Activity Management
Activity Management provides users the ability to effectively manage and visualize activities. Activity Management capabilities (i.e., Activity Calendar and Activity Grid) exists at both the Opportunity Level and Company Level (Central Tasking). The functionality between Opportunity Level and Company Level are practically the same, but the accessibility to information differs. At Opportunity Level (i.e., the Opportunity’s Pursuit Flow Activity Tab), you are limited to activities and corresponding opportunity dates for that opportunity only. Whereas in Central Activity you can view activities and corresponding opportunity dates across all opportunities you have access. In addition, Central Activity grid data column options have been extended, providing necessary fields (i.e., Opportunity Name, Opportunity Alias) to assist the user in filtering.
Central Activity
To access Central Activity, click on “Central Activity” at the top of the Capture2Proposal application.
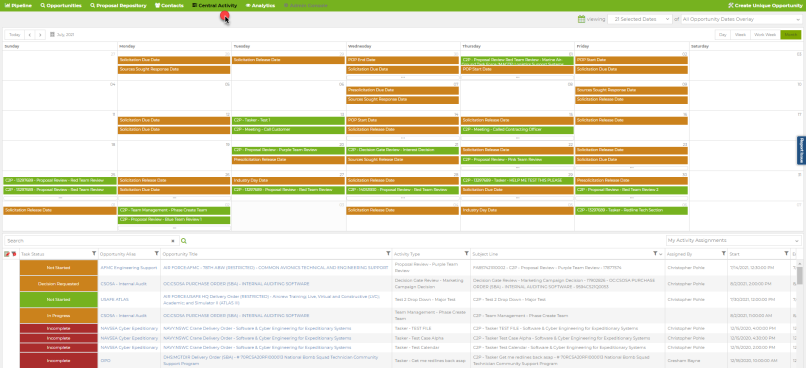
- Keep a holistic view of your efforts with the calendar view. Select the types of dates to show in the calendar view with options for all Opportunity date types, not just activities.
- Filtering for certain types of opportunities, activity participants, and more to view the activities with the greatest personal or mission relevance to you at any given time.
- Open links to the opportunity, the activity, or opportunity documents with ease from this view.
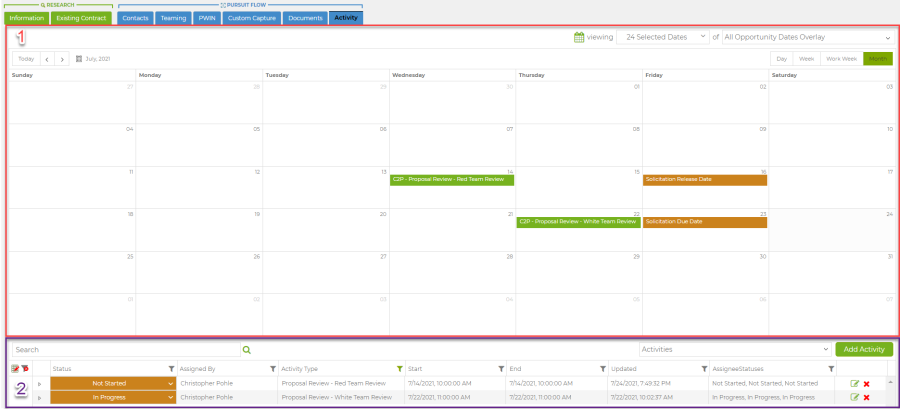
Activity Management (Opportunity Level – Pursuit Flow Activity Tab)
The Activity Tab allows the user to create, review, edit and manage activities associated to the opportunity. The Activity Tab is only active on opportunities that have been added to your company’s pipeline. The Activity Tab consists of the Activity Calendar (item 1) and the Activity Grid (item 2).
Activity Grid Views
The Activity Grid provides the user the ability to create, review, edit and manage their assigned activities (i.e., My Activities) and activities they have initiated or have (i.e., Activities)

- List View Selection: The Activity Grid allows the user to toggle between “All Activities” or “My Activities” via a drop down (item 1).
- “My Activities” displays activities that have been assigned to the user.
“All Activities” displays all the opportunity’s activities the user has access to, based on their assign role.
- Activity Grid Search: Search is used to select all the activities that contain the Key word or phrases that you provide. Type in a key word or phrase you would like to search on in the “Search” input area located in the top left corner.
 Select the magnifier icon to perform the search. To reset or search again, clear or type in new key words and select the Magnifier icon again.
 -
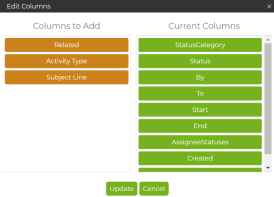
Column View Selection: Data Elements can be added or removed from the grid by selecting the Icon in the far-left corner of the grid. Once selected an Edit Columns window will display the “Columns to Add” and “Current Columns” selection options. Simply move the data element from the “Columns to Add” to the “Current Columns” selections by clicking the left mouse button on the data element you are interested in and dragging the data element to the “Current Columns” selection. To remove a data element simply drag a data element from “Current Columns” to “Columns to Add”. The order of the Columns can be updated by dragging the data element to a different order within the “Current Columns” options pane. After you have updated the data elements, select “Update”. The new Data element Columns will now appear in the grid.
-
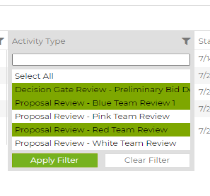
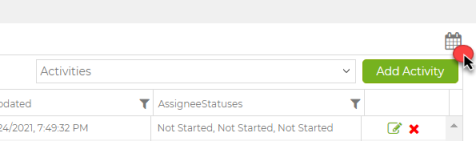
Data Element filters: The grid results can be further filtered by criteria entered for each data element. Filters may be accessed using the small funnel Icon next to each respective data element in the grid. By setting criteria in selected data elements, you can select only the sub-set of the data you would like to see. You may set multiple data elements filters in your grid.
 - Edit an existing Activity: An existing activity can be edited by selecting the update icon
 in the activity grid. Once selected the Create/Manage Activity window will open with the activity information populated. Simply update the required information and save the Activity.
Activity Calendar
The Activity Calendar allows the user to visualize activities (currently displayed in the Activity Grid) in conjunction with selected opportunity and custom capture date fields related to the opportunity.
The Activity Calendar is displayed by the user selecting the Calendar Icon in the top right of the Activity Grid. Once selected, the Activity Calendar may be toggled on and off by selecting the Calendar icon again.
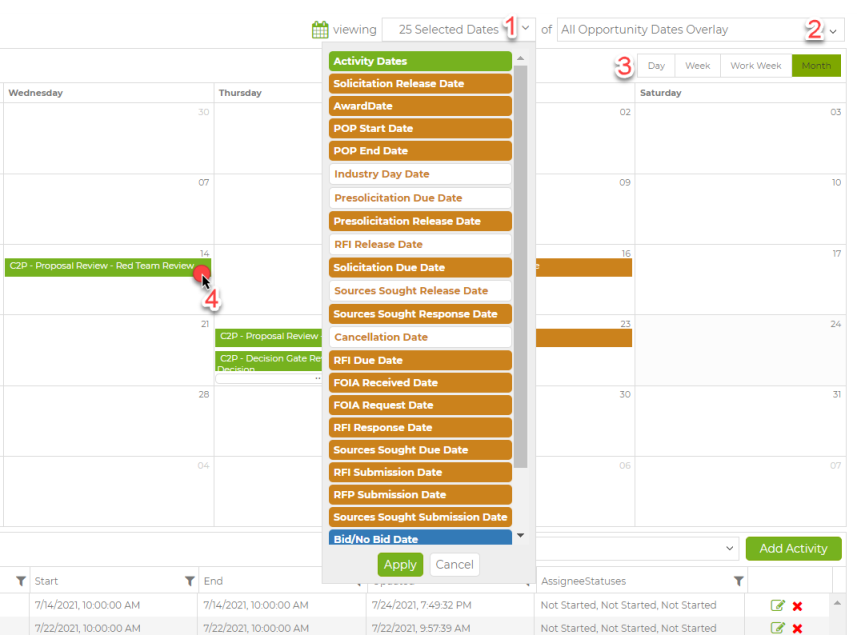
- Selected Dates: The selected Dates pull-down displays the date fields that will be displayed on the Calendar. This is helpful so that only the dates that are important to your company are displayed. The Date field options are color coded Green, Orange, and Blue. Green represents the Activity dates that your company has set. The Orange fields represent the opportunity dates set by the government. The blue fields represent custom date fields set up by your company. Only the dates that are highlighted in the “Selected Dates” options pull Down will be displayed. All the Activity dates will be toggled on and off by selecting or deselecting the green “Activity Dates” Option. The “Selected Dates” pull down displays the current number of date types currently selected.
- Opportunity Dates Overlay: The Opportunity Dates Overlay is an easy way to toggle the Government Dates that have been selected in the “Selected Dates” Option on and off. This option is helpful in uncluttering the calendar to view only the Activity dates created by your company.
- Calendar View by DAY, Week, Work Week, Month. The calendar view will change in accordance with the option selected. The Day calendar presents a day view by hour. The Week view displays a “Week at a glance” view including week ends. The Work Week view displays only Monday through Friday. The Month view displays a full Month. Each view may be incremented or decremented using the tool located in the top left corner of the Calendar.
- Edit/View Activity Calendar: Activities listed on the calendar can be edited and reviewed by clicking on the activity.