Global Contacts and Organization Profiles
See key data at the individual or company level to put the information you need at the forefront when making any business decisions.
Global Contacts
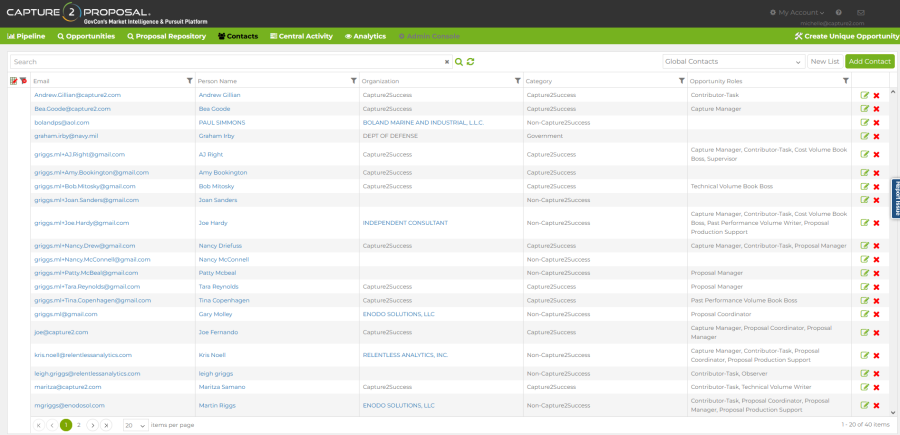
The contacts page visible in the green ribbon of the header bar is the primary list of all the contacts you have associated with your account. This list serves as a central portal connecting information on contact organizations, activities, and roles, across all of the data within our application. Easily cross-reference data to keep all the information you need to know right at your fingertips when any interactions occur!
This list is visible to all licensed users, and works as a shared contacts directory. This contact list does not give contacts any access to the app.
- Press the Add Contact button in the top right corner of the page.

- The following pop-up will appear. Enter the user's email address first and the remaining information will autofill wherever possible based on the email address.
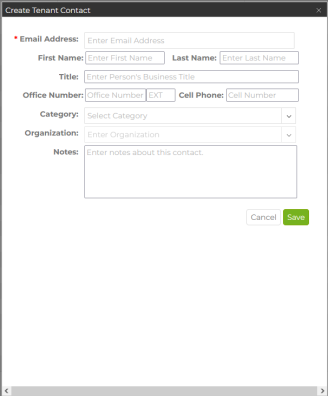
- The following pop-up will appear. Enter the user's email address first and the remaining information will autofill wherever possible based on the email address.
- Make any additional changes you'd like.
- Press

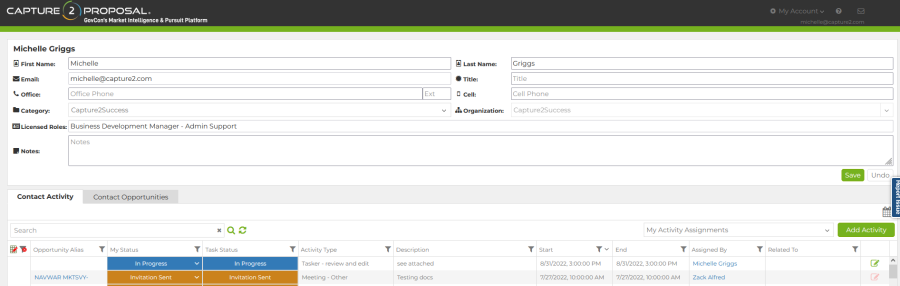
- You can click a contact's name, email, or the edit icon on the contact row to view and edit the contact's details.
- Please note that clicking the name or email anywhere in the application where it is shown with a hyperlink and this view will open in a new browser tab.
- Edit any fields necessary.
- Press
Only the Business Manager and Business Manager - Admin accounts have permission to delete contacts from this page.
- Press the X icon on the row for the contact in the contacts grid.
- Before a contact is deleted, you will be shown all opportunities where the contact has a role, and given the option to reassign all active roles to another user (new or existing) using our Bulk Reassign option.
- If reassignment is selected, you will be sent to the admin console bulk reassign screen to complete the process.
- If reassignment is not selected, the user will be deleted and their roles will not be reassigned to alternate users.
- After the user has been deleted, any completed work by that user will show their name with an "(inactive)" tag following it to indicate that the user is no longer active in your Capture2Proposal instance.
View all the roles any contact has within your company's C2P instance in the contact view to see how active your relationship is with the contact. View and create activities for the contact directly from this page as well!
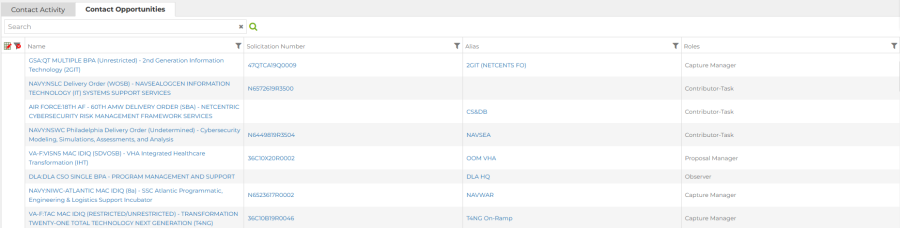 The Opportunities tab will show you any roles the contact has with in your organization. This is a great way to quickly see which roles a contact has held on past or current opportunities within your pipeline.
Activities can be associated directly with contact(s) alone, or with contacts and opportunities. This means that you can create activities that show your relationship with a contact even outside any teaming you've done or have planned on specific opportunities.
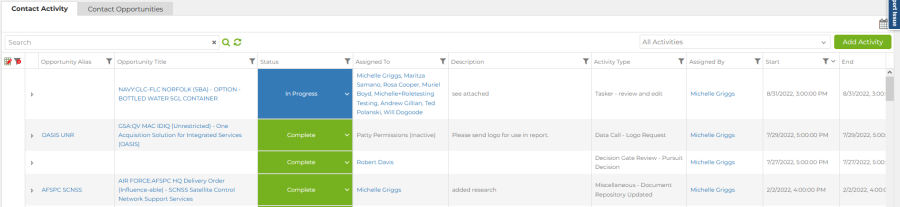
In the Activity tab in the contact view, you will see a list of all activities associated with that contact. This view shows what they're working on right now, how they're progressing, and can help you determine what type of work you'd like to continue with this contact.
Use the green "Add Activity" Button in the top right corner to add a new activity associated with this contact. Select whether to associate it with an opportunity, or leave it with no activity association. You can always edit this value later if needed. Follow the instructions for creating an activity here to learn more about creating activities.
Grid Layout Options
- To choose the visible columns click the "Edit Grid" icon in the top left corner of the grid.

- Drag and Drop Columns to the right to add the column to the page, or to the left to remove it from the page.

- Hit Update to save changes to the screen. This will be your default view until another update is made.
- Change the Order:
- Click somewhere in the middle of the column header for the column you'd like to move. Hold down the mouse button, and move right or left. The column title box will move accordingly with your mouse arrow.
- Stop holding the mouse button when you have reached the place you'd like the column to be, and the column will be moved to that location.
- Change the column width:
- Hover over the line separating two columns until the cursor changes to indicate that you can adjust the column width.
- Hold the mouse button down and move the mouse left or right until the column is the desired width.
-
Click once on the column header for the column you would like to sort.
- A second small arrow will appear immediately after the column title if that column can be sorted.
- The arrow defaults to facing up, and the column is sorted in alphabetical or numerically ascending order.
- Click the arrow, and it will switch the order to reverse-alphabetical or descending numeric order.
- Click again and the default table order is reinstated.
-
The right side of each column has a filter icon if the column can be filtered.
 Click on the filter.
- The filter will open to a type that matches the data type of your column, e.g., a text filter for text-based data, a drop-down options for drop-down data, etc.
- When you set your criteria and click "Apply Filter" the filter will be applied, and the filter icon will turn green to indicate that a filter was applied to that column.
- To clear a filter on an individual column, click the filter icon again and click the "Clear" button.
- To clear all filters from the data set click the clear all filters icon located in the top left corner next to the column options icon.

Organization Profiles
Keep information on your teammates (or competition!) right at your fingertips, including their government award dollars, contract vehicles, and available contacts.
Whenever you see an organization name that is a hyperlink, you can click on it to view the Organization Profile in a new browser tab. This is most often the case when viewing from a contact within an organization, or the Federal Spend Analytics views.

The organization profile overview tab shows you key corporate data for the organization, showing you what vehicles they're on, where they're located, and who their government contacts are quickly.
- View all contacts associated with this organization by either your organization or C2P. Click the add contact icon by any C2P-loaded contact to add them to your global contacts as well.
- When viewing an organization that is saved in your contacts, you can edit data by clicking in any editable field, and add other information you have on the company, e.g., edit the address to match the office location you deal with most.
- Full Edit/Replace allowed on organization name, address, corporate URL, and phone.
- Edit to add fields allowed for Contract Vehicle and Self-Reported Set-Asides; you cannot remove data C2P has placed in these areas.

View federal spend data for the Organization by clicking on their name wherever it appears as a hyperlink and selecting the Analytics tab in the top right corner.
- Any graph component created for federal spend data can be loaded to the view, or build new views to answer your questions, e.g., how much money has this organization won on the SeaPort-NxG contract vehicle to date?
- Select from three important data views:
- All awards on which the selected organization won work as a Prime
- Any reported work performed by subcontractors on the organization's prime contracts
- Any reported work the organization performed as a subcontractor
- Filter data, select varying views, and capture exactly the content you need to make your teaming and bidding decisions
- Download data and views you want to share with users outside your company's licensed users, to include both graphs and excel data loads