Configure Activity Options in the Admin Panel
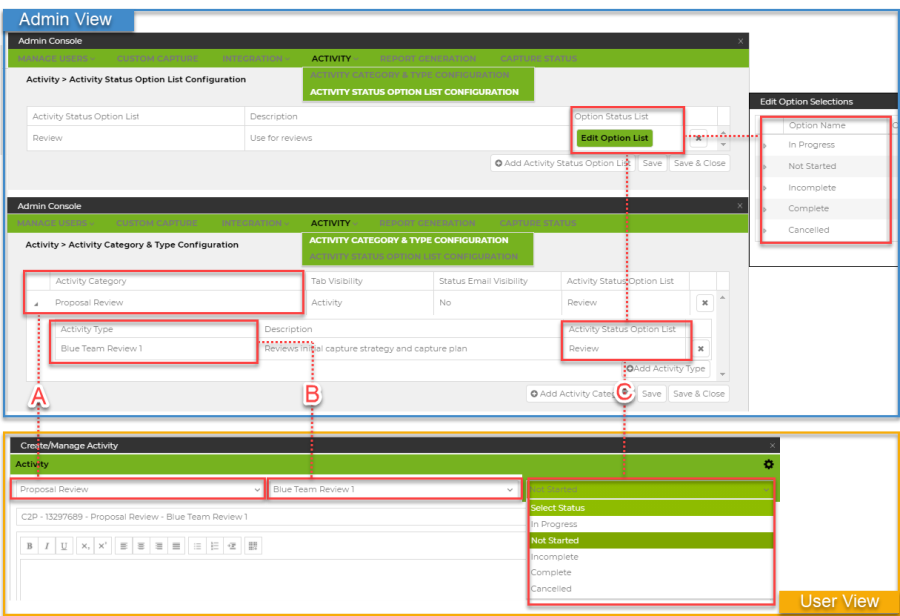
In the Admin Console, the Activity Tab allows the user to create, update and configure Activity Categories Types and Activity Status Option List. The C2P Activity Management philosophy is to create an environment that functions the way your organization does, while providing best in class structures to maximize your success. As illustrated below, C2P empowers its customers’ authorized users to easily create (A) Activity Category, (B) Activity Type, and (C) Activity Status Option Lists, customizing C2P Activity Management capabilities to align with your company’s business processes.
Activity Category Type Configuration
The Activity Category Type Configuration Panel allows authorized users the ability to create, modify, and/or delete Activity Categories and Activity Types. To access the Activity Category Type Configuration Panel perform the following step(s):
Steps:
- Click “Admin Console”
- Click “Activity”
- Click “Activity Category & Type Configuration”

The Activity Category & Type Configuration grid provides access to Activity Categories and Activity Types within those categories for your organization.
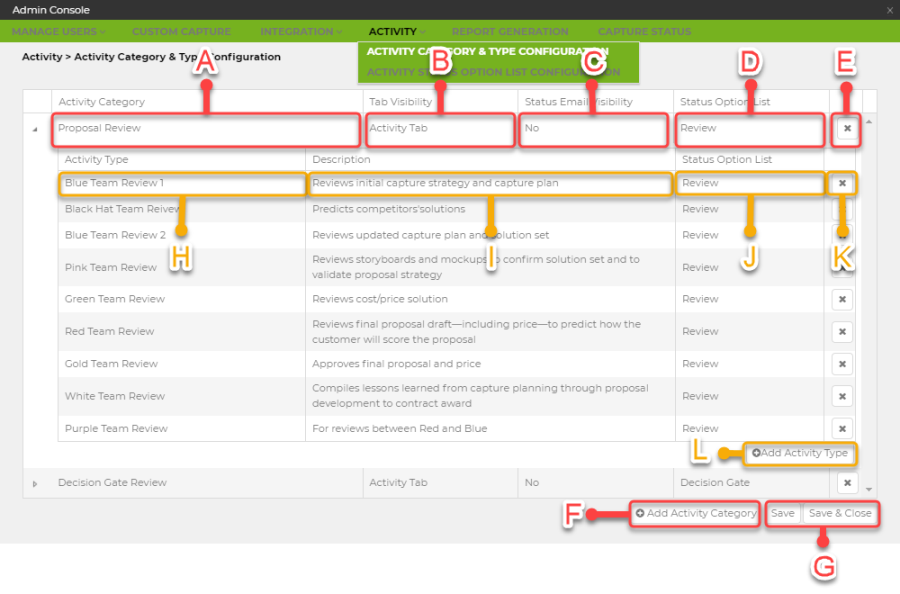
The following provides descriptions of all the key elements within the Activity Category & Type Configuration panel and grid.
- Activity Category: Contains a logical grouping of Activity Types. For example, an Activity Category (e.g., Proposal Review) can contain various Activity Types, such as Blue Team Review, Black Hat Team Review, Red Team Review, etc. Activity Categories are used to organize Activity Types by phases of the business development lifecycle, general type of activity, or functional areas of responsibility.
- Tab Visibility: Indicates where, in the application, the activity option is available (i.e., Activity Tab, Activity Tab or Teaming, and Teaming”)
- Status Email Visibility: Provides the ability to include or exclude status updates for this activity category in the weekly/daily roll up emails.
- Status Option List (Activity Category Level): Provides the ability to set the Status Option List for the Category, in the event that no “Activity Types” have been added to the Category. If no Activity Type(s) are created, the status option list selected will be the default.
- Delete Activity Category Button: An existing activity can be deleted by selecting the delete icon
 in the activity grid. Once selected, a prompt will ask if you are sure you with to delete the activity. Simply select YES and the Activity will be deleted. Note: You may only delete an Activity from all Activities Grid.
 - Add Activity Category: When clicked it adds another Category record, which can be edited by the user.
- Save & Save and Close: Saves updates made to Activity Category and Activity Types.
- Activity Type: Provides the name of the Activity.
- Description: Provides a description of the Activity Type.
- Status Option List (Activity Type Level).
- Delete Activity Type Button: Allows users to remove an Activity type.
- Add Activity Type: Provides the user the ability to create a new Activity Type
Create New Activity Type Category
To create a new Activity Type Category, perform the following step(s):
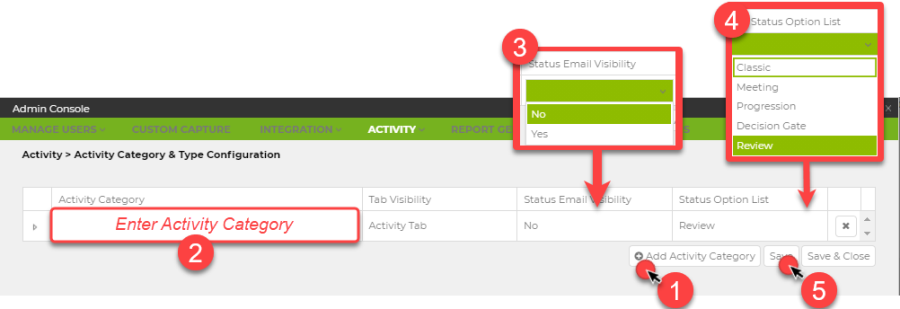
- From the Activity Category & Type Configuration Panel click “Add Activity Category” button at the bottom of the grid. A blank Activity type Category is added to the Grid ready for configuration.
- Click on the newly created Blank Activity Type Category name input area and enter the desired name of the Activity Type Category.
- Select “Email Visibility”
- Select “Status Option List” and select the appropriate status progression options from the predefined Status types.
- After all the Activity Type options have been selected, click the “Save or Save and Close” button at the bottom of the Activity Grid.
Create New Activity Type
Once an Activity Category has been defined the user can create Activities under it by selecting the small caret on the far left of the respective activity grid.  This displays the Activity Types within the Activity Type Category in a sub-grid. This is where you may add, remove, or configure Activity types. Activity Types may be re-configured at any time by opening the Activity Sub-grid and updating the information. With the Activity Type Category expanded using the Grid expander carrot , Select the Add Activity button from the sub-grid. Perform the following steps to create a new Activity Type.
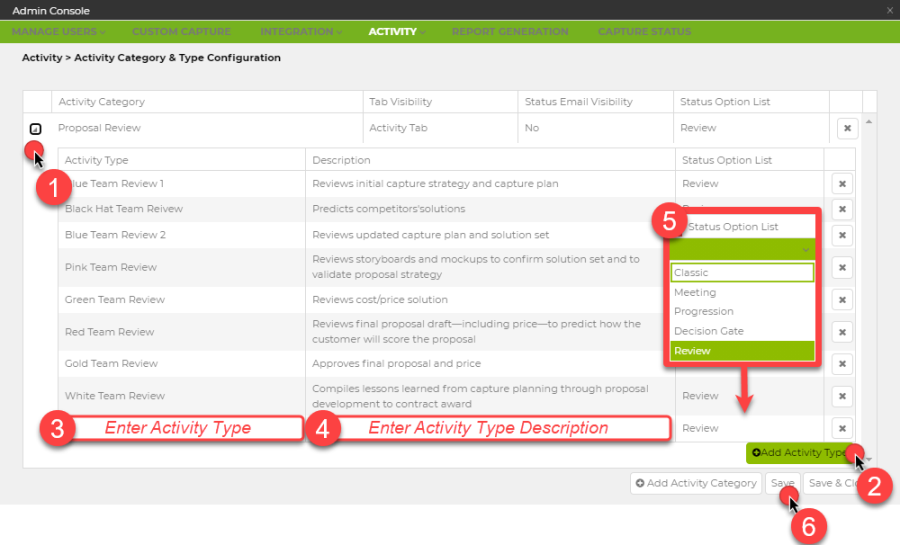
- Click the expand carrot under the Activity Category you wish to add an Activity Type to.
- Click “Add Activity Type”. This adds a blank Activity Type to the sub-grid ready for configuration.
- Enter the Name of the Activity Type
- Enter a Description of the Activity Type
- Select the Activity Status Option List (A default one will be there too)
- Click the Save button at the bottom of the main Activity Grid to save the new Activity Type. Selecting Save at the bottom of the Main Activity Grid saves the changes.
Activity Status Option List Configuration
The Activity Status Option List Configuration Panel allows authorized users to manage (i.e., create, update, and delete) Activity StatusOption List(s) and their respective Status Options. To access the Activity Status Option List Configuration Panel, perform the following step(s):
- Click “Admin Console”
- Click “Activity”
- Click “Activity Status Option List Configuration”
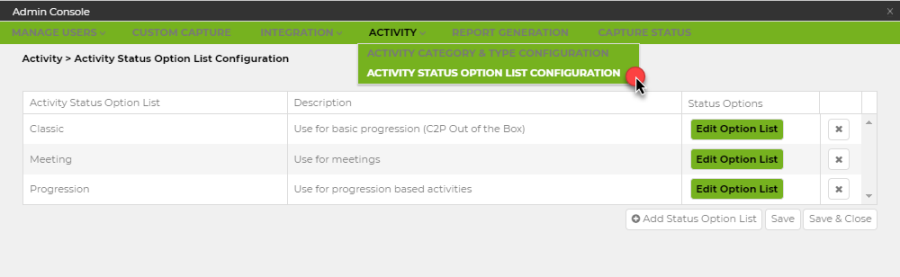
The Activity Status Option List Configuration grid provides access to Activity Status Option List(s) and their respective Status Options for your organization.
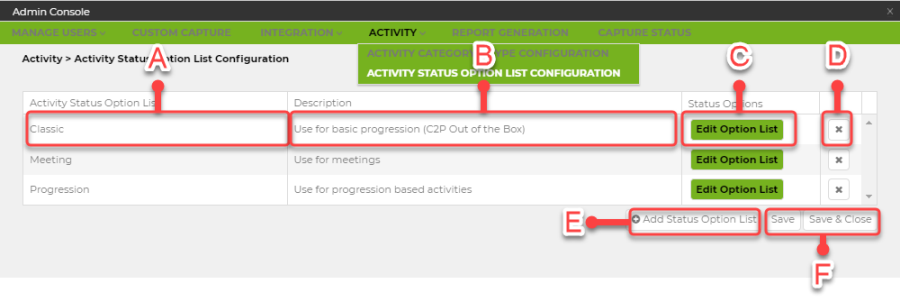
The following provides descriptions of all the key elements within the Activity Category & Type Configuration panel and grid.
- Activity Status Option List: Provides a list of predefined status types utilizing an easy to understand and customizable naming convention. These status types allow users to configure and group custom status options that represent the current set of states an activity can be in.
- Description: The Activity Status options Description is a short phase that further describes the Activity status options list name.
- Edit Option List: Each Status Option type contains a list of status configuration options. These options contain the list of states or (option Name) each Activity status group contains.
- Delete Activity Status Option List Button: This button will remove the entire Activity Status group name and all the individual status options contained within.
- Add Activity Status Option List Button: This button will add a new blank row for a new Activity Status Option group name ready for configuration.
- Save and Save & Close Button: This button is used to incrementally save your changes or Save and exit the utility.
 The following provides descriptions of all the key elements within the Activity Category & Type Configuration panel and grid.
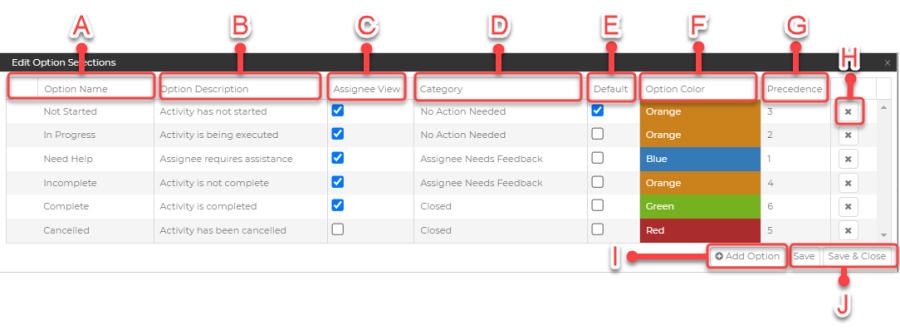
- Option Name: Represents the names of the status states an activity can be in. The status option names will be displayed as the status options within the activity grid. Status options change to correspond to the activity type and corresponding status option list.
- Option Description: Represents a short phrase that further describes the Option name.
- Assignee View: The Assignee view check box determines the status options available to the assignee.
- Category: In order for C2P to manage notifications effectively and provide users, who use “Central Activity Management” a logical grouping of various Activity Status Types, a Category should be selected. An authorized user may assign any of the following categories (i.e., Assignee Needs Feedback, Assignee Declined, No Action Needed, Closed). Other categories exist that are not available to the user, such as "Past Due". The past due status is automatically assigned to an activity if it is not categorized as "Closed" and the end date has passed. These categories have 2 purposes:
- Sorting: When the activity or assignment grid is loaded the grid will be sorted based on activity category following the order shown above. IE - the user will first see "Assignee Needs Feedback" categorized activity, then "Past Due", then "Assignee Declined", and so on.
- Notifications: Any activity not categorized as closed will still be active for past due notifications and reminders.
- Default: The Default check box determines the initial state of an Activity when it is assigned.
- Option Color: The status option color will determine the color the status will appear in the Activity grid.
- Precedence: The precedence option sets the status for the Activity if multiple team members are assigned to the Activity. If multiple assignees have different statuses, the status with the lowest precedence will be used to set the rollup status.
- Delete Option Button: Removes the Status option from the options list.
- Add Option Button: Adds a blank new row to the status options list ready for configuration.
- Save/Save & Close: Incrementally saves the changes you have made or saves your changes and closes the utility.
Create Activity Status Option List
Within the Activity Category & Type Configuration panel you may add, remove, or configure Activity Status Option List(s) and their respective Status Options for your organization. Activity Status Option List(s) may be re-configured at any time by clicking on the desired record in the grid.
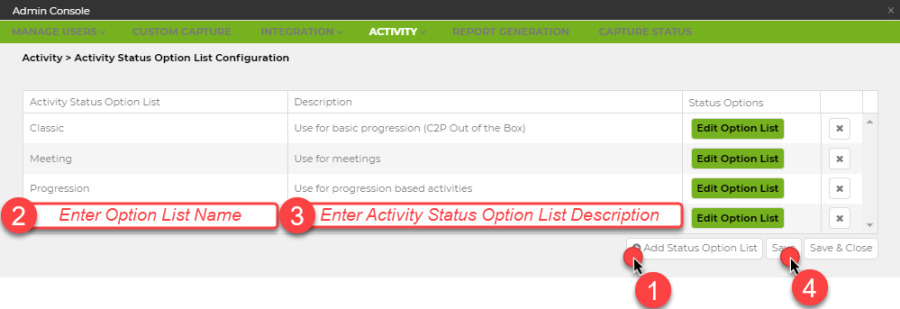
- Click “Add Status Option List”. This adds a blank Activity Status Option List to the grid ready for configuration.
- Enter the Name of the Activity Status Option List
- Enter a Description of the Activity Status Option List
- Click the Save button at the bottom of the grid. Selecting Save at the bottom of the Main Activity Grid saves the changes.
-
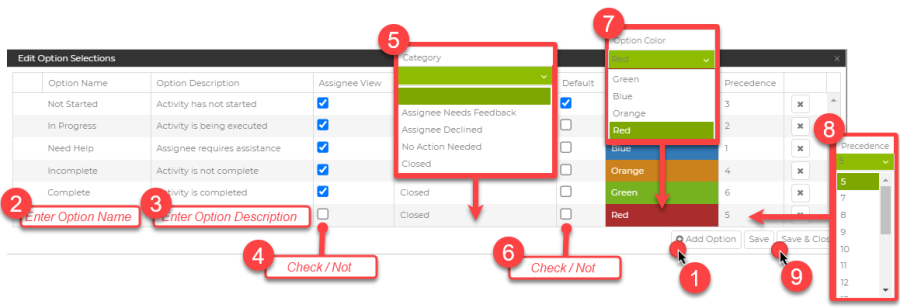
Click “Add Option”. This adds a blank Option List Item to the grid ready for configuration.
- Click on the newly created Blank Option List Item and Enter the Name of the Activity Status Option List
- Enter the Option Description
- Check the Assignee view if you wish Assignees to have access to that option in their view of the activity.
- Select Category
- Check if you wish the option to be the default status when the activity is created.
- Select the Color you want the option to display when selected.
- Select the Precedence of the option.
- Click Save or Save & Close